Visitors have accessed this post 359 times.
I’ve come to recognize the value of having a well-designed keyboard it’s the interface to our work and the display piece at the centre of our desks while we can buy something off the shelf they don’t compare to the joy and satisfaction of building one yourself.
Hello am K.Nithiya, I’ll share the process of building a custom mechanical keyboard from start to end and show you ways you can personalize it for those curious about the hobby before we begin i want to thank square space for sponsoring this portion of the article as a relative newcomer myself I know how overwhelming it is to buy and build your first keyboard there’s a lot of good information out there but it can be challenging to connect all the dots that’s why I’ve collaborated with keyboard enthusiast same pack to put together a created guide to help you navigate your first build thanks to square space
.I’m able to host design and publish content like this on my blog modmusings.com the blogging tool square space offers makes it easy for me to create rich media experiences and embed articles directly from Social media because of the analytics. I’m able to measure the performance of my content and where my audience is coming from so, I know where to focus my efforts to grow my business.
I’ve been using square space for over a decade to build multiple sites the process has always been intuitive and the results are always beautiful head to squarespace.com for a free trial and when you’re ready to launch go to squarespace.com Matthew and sent to save 10 off your first purchase of a website or domain thanks to square space for sponsoring this portion of the article now let’s build our keyboard.
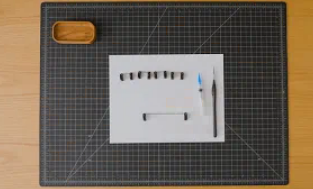
Today we’ll be building the mode sonnet a 75 layout keyboard that comes in a huge variety of colours materials and accents which is a good representation of what you might find out there this keyboard was sent to me by mode for this article and is currently available for pre-order which I’ve linked to in the description while this is a prototype it’s very close to what the actual production unit will look like every keyboard is made up of these main components the case to house everything the pub which allows the keyboard to communicate with your computer the plate that holds your switches in place stabilizers for longer keys like spacebar and enter the switches which connect to your pub and the keycaps the face of your keyboard the case pub and plate are often sold together as a keyboard kit while the stabilizer switches and keycaps are commonly sold separately there are also extra components you can buy that are optional which we’ll talk about later to assemble your keyboard you’ll need a few tools some of which might already come with your keyboard kit precision screwdriver lubricant a small brush tweezers keycap puller switch puller and lastly based on your pub a soldering iron if this is your first build .
I recommend getting a hot swap pub like we’re building today which allows you to install your switches and swap them out without the need to solder once you have all of your components the first thing you should do is test your pub you want to make sure everything functions properly before you spend the time to build everything to do that you’re going to take your pub and connect it to your computer this keyboard uses a daughter board and jest connector so we’ll have to plug those in first next you’ll open up a key testing software I use via and test that each key works by using a pair of metal tweezers to make contact with the sockets one tip to make this easier is to flip the pub over and make contact with the back as the conductive area is easier to access in the rare case that something isn’t working you can reach back out to the manufacturer for a replacement now that we know the pub works we can move on to the next step first we’ll need to assemble and lubricate our stabilizers which are essential for keeping our long keys like the space bar balanced and supported .
when pressed the goal here is to have your stabilizers tuned to the point where they don’t rattle for smooth operation and sound this is something I’m still trying to get better at but in the build guide I’ve linked a great article by Alex autos that covers this process in detail as a quick overview .I’m making sure that the stabilizer wires are straight lubricating the housing and wires wherever friction may occur then assembling the wires and housing together next.
I’ll be installing these stabilizers onto the PCB clipping them in you might need to screw yours in depending on the stabilizer you’re using before moving on you want to do a quick test to make sure the stabilizers are installed flat and are operating correctly if you hear rattling or the keys get stuck it usually means that the stabilizer isn’t seated properly or you need more lubricant for more details check out the guide linked in the description next we’re going to grab our plate which will hold our switches in place the plate material you choose will have a big impact on the feel and sound of your board there’s a great article by content creator keyboard that explains the science behind this but
I’ll generalize it here the stiffer your plate material the higher pitch the sound might be the softer your plate material the deeper the sound might be there’s a lot more to it and I’ll share examples later in the article of how different configurations of plate materials sound modifiers and switches affect the overall feel and sound if this is your first build i recommend starting with an aluminum or fr4 plate which sits in the middle of the material stiffness. I’ll use the fr4 plate and install it onto the PCB standoffs next up is to install our switches there are so many mix-style switches available on the market these days that fall into three main categories linear which is a smooth press from top to bottom tactile which has a noticeable bump and clicks which has a tactile bump and an additional clicking sound if you’re still figuring out what you like i recommend buying a sample pack of various switches to discover what your preferences are the switches.
I’ll be using are these kazoo boba u4t tactile switches which come factory lubricated but have had them additionally hand lubricated for better performance hand lubrication of your switches is optional which you can do yourself or have done for you I’ve left details all about this in the build guide when you install your switches i like to start in the corners to help align the plate and PCB together then work my way from the middle out i found this order to be especially helpful when working with softer plate materials or PCBs without screw standoffs a few tips here before you install any switch make sure the pins are straight so they go into the socket properly if they’re bent use tweezers to straighten them out make sure you brace the back of the PCB and firmly press the switch straight and evenly so they clip into the plate if your plate ever starts sagging you can always pull up the edges to make sure the plate and PCB are parallel to each other you’ll notice on this PCB a few keys have options of facing north or south these are the other supported layouts of the board like a longer 7u space bar or shorter 6.25 u space bar before we move on to the next step it’s a good idea to test all of your keys once more this time pressing your switches you might find that one of your keys might not be triggering in that case we’ll use our switch puller grab the tabs and pull it out of the socket usually the problem is the pin didn’t go incorrectly and you might have to straighten it out if it got bent on the way in with everything working properly we’re going to now mount the PCB and plate to our case each keyboard has its own mounting style that varies and again will impact the final feel and sound of your board for the sonnet we can mount it in two ways an isolated top mount for an open sound signature and flexible typing feel or stack mount for a muted sound signature and firm typing feel. I’ll show you the differences between both but for now I’ll go with the top mount installation to do that i’m going to slide on the provided silicone plate caps and fasten the plate onto the top housing of the case now we’ll move on to the base first we’ll install these rubber feet onto the bottom for added grip and protection many keyboards these days offer optional weights out of heavy materials while they don’t affect the board’s function they can impact its sound feel and aesthetic the weight i’ve chosen is this beautiful copper which you can see through the polycarbonate base up next we’ll install the daughter board into the base with the provided fasteners then we’ll take the JST connector and plug it into the PCB making sure the pins line up now we can close the case and screw it back together the last step of assembly is to add our keycaps the face of your keyboard keycaps come in various height profiles and are made from different manufacturers it’s a deep well to explore on its own from my experience i personally enjoy keycaps in the cherry profile because they’re the most comfortable for me to type on for this build.
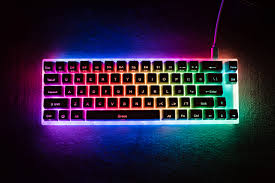
I’m using gmk9s a dark grey and cream colour which i think pairs well with this board these keycaps are designed so that each row has a different angle for better typing comfort because these keycap sets are designed to fit a variety of keyboards you may see duplicates of some keys that have different heights and angles you can always check by looking at the profile of how your keycaps sit on the board if you accidentally put in the wrong height keycap you can use your keycap puller to take it out and replace it this last step is optional if you’re a MAC user or want to alter your key map layout you can simply plug in your keyboard load up via and remap the keys to your liking you can also program macros if you’d like to utilize shortcuts now we have a completely built keyboard ready to use here’s how it sounds while we could be done there there’s so much more we can do.
I’m going to show you how changing a few components of this keyboard can have a big impact on the aesthetic feel and sound while i enjoy that open sound signature let’s go for something deep and muted to accomplish that i’m going to use the two sound modifiers that you can buy with this keyboard the silicone dampener for the base and the foam that sits between the PCB and the plate this will change our mounting style of the board to be stack mount which will produce a more firm typing feel these two should have a significant impact on the acoustics of the keyboard let’s test the before and after [Music] while i like the sound of this I want to take it a step further first .I’ll change my plate out to this very soft palm material next I’ll change out the switches with these hand lubricated gearing black ink linear switches these two should make the sound signature a little bit deeper based on my experience with them and for fun i want to add a little visual flair i love the copper accent of this board so as a small side project i decided to DIY my own copper space bar this was a lot more challenging than i thought and my first attempt was really bad because the paint didn’t sit well and was very uneven that’s because i was impatient and globed on too much paint on each pass so i tried again and the second attempt came out so much better this time I sprayed lightly almost like a mist and was a lot more patient taking my time I’ll post a short tutorial on my instagram if you want to learn more about the process now here’s how this configuration looks and sounds while some people love the feel of a mechanical keyboard sometimes you or your co-workers might not love the loud sound luckily there’s such a thing as silent switches my favourite is the gazoo boba u4 switches because they offer a large satisfying tactile bump like the u4ts while being close to silent for this configuration i want to change the aesthetic to go for a black theme so I’ll switch out the accent piece at the top and change out the back piece of the case mode laser engraved this for me based on a design i made while they don’t offer this as a service you can easily find vendors that do next i’m going to swap out the keycaps with put fans neon which are these unique translucent black keycaps here’s how our black and silent configuration sounds now to go the opposite direction what if we want something loud and bright let’s start by removing our silicone and foam dampeners converting this back to an isolated top mount configuration then we’ll change our plate to carbon fibre it’s the stiffest material i have which can produce a higher pitch sound next we’ll change our switches to these hand lubricated durance koala tactile switches which from my experience are louder and higher pitch compared to the bob u4 keys to change up the aesthetics.
I’ll swap out the keycaps with GMK minimal a classic black on white set for fun i want to give my keyboard a white oak wood accent to match my desk setup because mode doesn’t offer anything in wood i reach out to my friend bow of design craft workshop to help me out bow is a woodworker and content creator who i met online he used this cnc machine to mill a custom accent piece for me which he handed down and finished with polyurethane upon arrival i had to do a little more sanding to get it to fit into the keyboard i tried to add screws using a tap but for whatever reason i was having a hard time getting the screws to go in luckily the accent piece pressure fits into the slot and doesn’t seem to pop out this will do for now between the stiff carbon fiber plate isolated top mount and Dura koala switches i expect the sound signature to be much louder and higher pitched compared to our previous configurations these four configurations should give you an idea of how much you can personalize your own build there are so many fun things you can do to customize your keyboard to suit your preferences and express your personality from different keycaps and switches custom artisans and accent keys laser engraving custom paint jobs or you can even DIY your own solutions the possibilities are endless and are what makes the hobby so much fun if you’re interested in the mode sonic keyboard we built today it’s available for pre-order right now starting at 299. there are millions of pairings you can select from using the configuration on their website which I’ll link to in the description below if you need help with your first keyboard build don’t forget to check out the guide on modmusings.com if you have any questions ask and I’ll do my best to answer with that out of the way it’s time to get back to work